This post contains affiliate links and I will be compensated if you make a purchase after clicking on my links.
My husband and I are both gum chewers. About a year ago we found our most favorite gum. Ice Breakers Ice Cubes, we both like a variety of flavors and LOVE the containers they come in. Between the two of us we go through a bunch of containers of gum in a short amount of time.
I have one in my locker at work, one in a cup holder in my car, one in my purse and one in a drawer in my kitchen. I am a little obsessed…maybe? Totally didn’t realize how many places I had a gum container stashed until I started working on this post. Anyways this post isn’t about the gum, it’s about the containers.
The containers fit perfectly into a cup holder or into a drawer. The hubs and I noticed we were throwing out/recycling a bunch of these containers a month. So my housewife/crafty/organized mind kicked in and upcycled gum containers are all over our house.
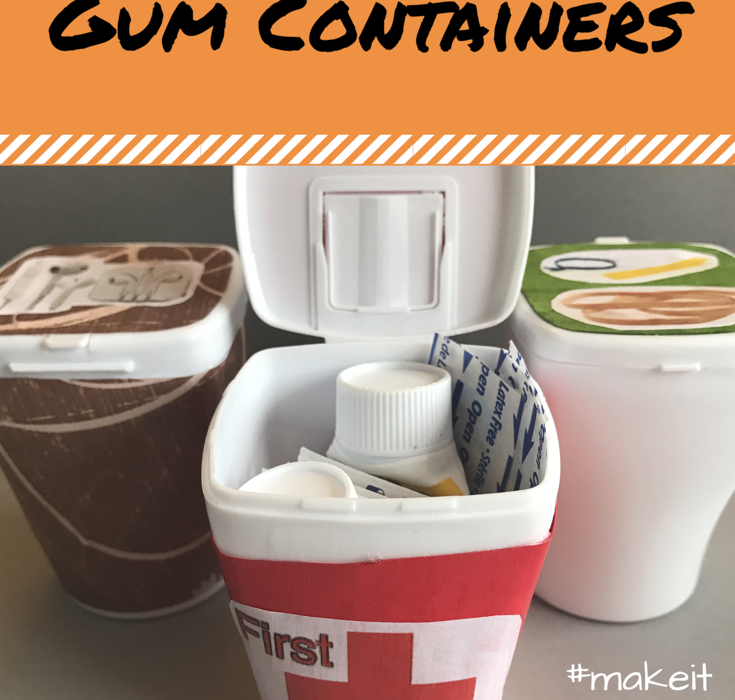
We have a container to hold our spare rubber bands and twist ties, one for a small first aid kit for the car, one for my ear buds, and a bunch for the boys “important” items. So these little storage containers were working great….but they looked….well….you see the picture above. Not attractive, luckily I do like to decoupage.
fun and quick Mod Podge project
First step, as always, assemble your supplies:
- Empty Ice Breakers Ice Cubes
gum containers, the labels just pull right off without any extra effort
- Mod Podge
- Scrapbook paper and printed off pictures of what you are going to place into the containers

Second step, trace your lid on a piece of paper you are going to use and cut it out within the line. It will then fit on the lid without going over the edge.
Third step, swipe a layer of Mod Podge on the top of your container and place the paper on the top. Use a flat edge (or your finger) to get out all the air bubbles.
Fourth step, seal the top with another swipe of Mod Podge.

Fifth step, prior to the sealing coat drying place the picture of what’s going inside your gum container. Finally add your sealing coat of Mod Podge.
Sixth (optional) step, add matching paper around the outside of the container. I added that after the tops had dried so as not to move top decorations around. I only add the extra paper to the gum containers that I thought we would see. The rubber bands/twist ties containers is going into a drawer and we will only be able to see the top.
I hope you enjoyed my quick Make it Monday project. If you have a resolution to organize your house or decrease your waste this craft can help you accomplish and stick to your goals.

Mother of 3
Such a cute idea!
Kim Amy
Thanks, we just made another one this week for the tooth fairy!
Sarah Howe @runjumpscrap
Such a good idea! I often wonder what to do with the tubs and they end up in the recycling. This kills two birds with one stone as you get organised too! Thanks for sharing with #bestandworst x
Kim Amy
Thanks so much, I know that’s what got me thinking about using them. They are a nice size and I really hated throwing all of them away.
Susan
I adore upcycled organizing projects. I can’t stand throwing things out that could be otherwise useful. I now have a great excuse to chew gum so that I can get organized. 🙂 Thanks for sharing at the #ThisIsHowWeRoll Link Party.
Kim Amy
So glad you enjoyed it. Super easy and I keep finding more things to make with them. Just whipped up a tooth fairy box for my oldest!