This post contains affiliate links and I will be compensated if you make a purchase after clicking on my links.
This table wanted to be built so bad. I saw it at IKEA and thought…I can do that for half the price. The IKEA version is about $129 US currency, other brands are even more expensive. This is the first full piece of furniture I built and stained from scratch. If I can do this so can you! I will tell you my rookie mistakes that I made along the way so you won’t have them. If you do make mistakes, it’s okay that’s the fun of DIY! Check my Instagram highlights “Bed Table” for the video step by step.
Supplies and Tools I used:
If you do not own any power tools, don’t despair. You can get your wood cut at most places you will need to purchase your wood from. All the rest you can do with hand tools, power tools just make it easier! First let’s check out the tools.
- Power drill
- Hand sander
- Chop saw
- Bristle brush
- Foam brush
- Clamps


The supplies are the items we are going to use up and so you may need to replace. All of these can be bought in smaller or bulk sizes depending on how many over the bed tables you intend on building!
- Stain (I used Ebony, but you can use whatever you like)
- Pre-Stain Wood Conditioner
- Polyurethane
- Mineral spirits (for cleaning your brushes)
- Multiple grit sand paper (coarse, medium, and fine)
- Tack cloths


Your over the bed table can be held together and made functional with many different options. I listed below what I used, but would love to see what others come up with!
- One 12″ x 6′ select pine board
- Two 2″ x 6″ timber boards
- Corner braces
- Mending plates
- Rigid casters
- Wood glue


Let’s Make This Beauty

Step 1: Buy the Wood
Actually step one is measuring your bed…..so you can buy the wood. I have a queen sized bed frame up on risers. To measure I sat on my bed and measured from the top of my legs down to the floor. I wanted to be sure I could fit under the table. Subtract the height of the casters and viola you’ve got it. Measure the width of your bed for the table top.
I purchased my wood at Menard’s, it’s a large home improvement store in the midwest. Take your time picking out the top piece of wood since this is going to be the one you will be working on for years to come from the serenity of your bed…..
There is a bunch of different options for wood I decided on little more expensive piece because it was better quality. I would avoid any wood that is going to warp or bend, there is no middle support in this table. If you are not sure what is a good wood to use from the assortment, ask one of the employees, if they don’t know, ask someone else.
Step 2: Prep the Wood
This over the bed table project uses all straight cuts. You can have your home improvement store make the cuts, use a chop saw, table or circular saw. I used a chop saw. Of course before cutting I measured like 15 times……well maybe not that many, but I measured it a bunch of times to be sure.

Next I sanded all the wood starting first with a course sand paper like 80 grit, then 150 grit, and finished with 220 grit. I used my rotary sander and wore a face mask to avoid inhaling all the wood particles. Using my rotary sander I rounded the edges of the top board slightly.


Step 3: Stain the Wood
Prior to staining it is always good to apply a pre-stain conditioner. I had a small container of oil based stain left over from a previous project. This was my first mistake. I ran out half way through and started using a water based conditioner for the rest of the project. There is a difference in the stain that I can see, so the side where it occurred is on the bottom of the table.

Following sanding, wipe down wood with your tack cloth then apply the conditioner in the direction of the grain. Wait 15 minutes for it to soak into the wood and then wipe off the excess with a lint free cloth. Now its time for the color!!

Stir the stain prior to using, avoid shaking the can, you do not want air bubbles. Apply the stain from the center out in an even layer, to avoid running over. I did not follow this direction very well, you will see later the run over problems I had.
Allow the stain to soak in for up to 15 minutes to have a deeper color on the wood. Wipe off any excess with a clean lint free rag. I wore gloves and switched to a more protective respirator for the duration of the project. After the stain you should wait 4 hours prior to applying more. I ended up doing 3 coats of stain.
Step 4: Protecting Your Desk Top

After the staining is done and you are happy with the finish, time to seal it with a little polyurethane. I used a water based urethane and applied it with a foam brush. Stain and poly have the same rules: stir to mix, apply in thin coats from the inside out to avoid run over, follow the grain when applying and protect your lungs when using. You need to wait at least 2 hours or until fully dry to apply the next coat. At least 3 coats of poly are needed for good coverage. Sand the poly between coats and wipe clean with a tack cloth to get a smooth even finish.
Step 5: Assembly
Once everything is completely dry check out your wood. Mine had some run over to the a few of the sides so mocked up the fit and put the good sides out and the less attractive sides in.

Using wood glue apply to the insides of the boards and clamp to hold in place. Next I attached mending plates to the reinforce the connection between the two boards. Check out the picture below you can see where my stain ran over, luckily this will be facing the bed.

Let the wood glue cure for about 30 minutes before attaching the top board. Using the clamps to hold the pieces together.

Next add the casters to the bottom of the boards, using wood screws for all attachments.

Then late at night when you are wearing your pajamas assemble the top on the two sets of legs. Just kidding, you can wear your regular clothing, no need for pajamas for this step. But when you are so anxious to complete this project you are willing to complete it in your PJs!

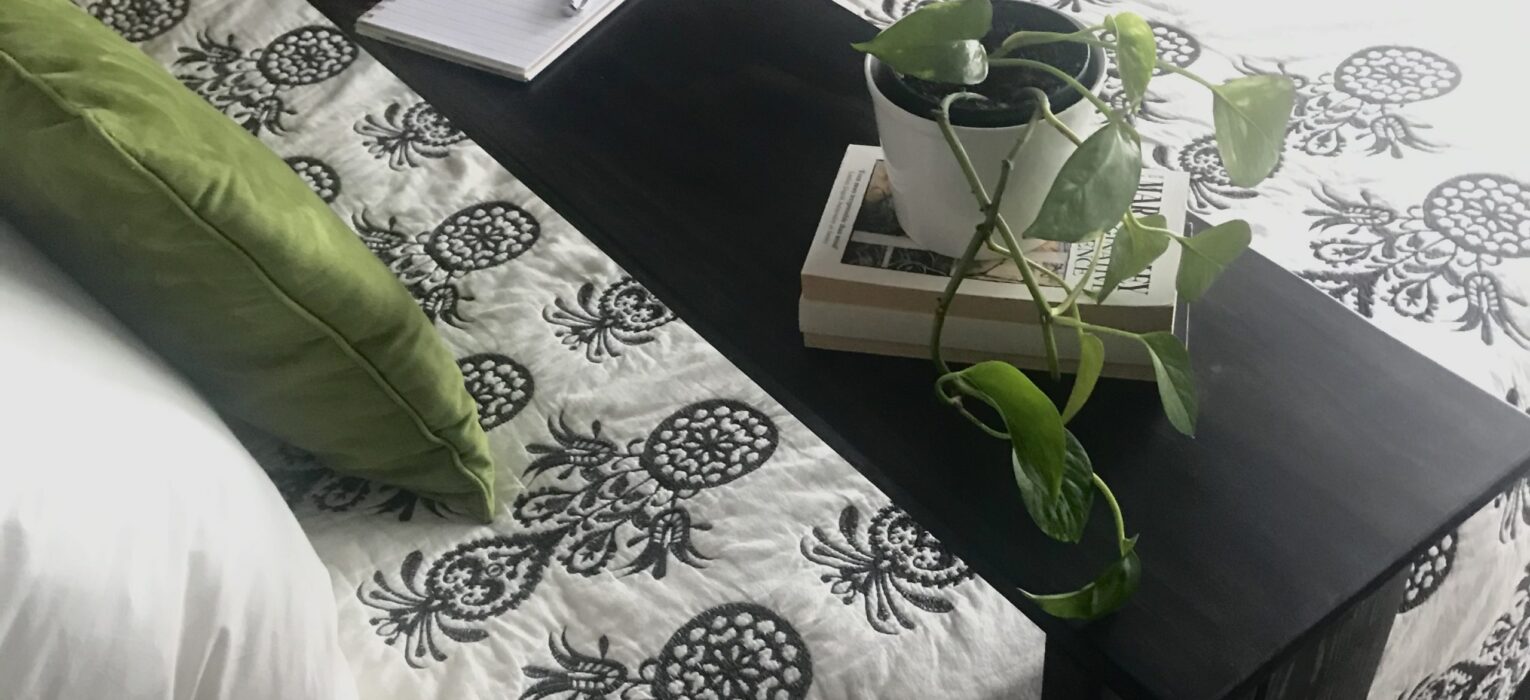
I completed the assembly in my bedroom, because I did not want to climb the steps up from the basement carrying a table the width of my bed. I love how it looks and it works terrifically.

Prices of the Products:
- 1×12 6 foot Select Pine board $29.48
- two 2×6 6 foot timber $9.38
- Mending brace $2.96
- Corner brace $13.98
- Rigid Casters $15.96
Total Cost: $71.76
I had all the other supplies I needed for this over the bed table including stain, brushes, conditioner, polyurethane and tools. If you do not have these supplies, it could increase your cost by about $25 dollars.
Let me know how your over the bed table turns out! To stay caught up with all my home DIY activities follow me, Kim Amy on Instagram @funhappinessandlife!

Monica
What an awesome diy project! It turned out amazing. I have never seen this kind of table before.
Kim Amy
Thanks, I happened to see it at IKEA awhile ago…but then did a search, there are a few available commercially much more expensive
Fatima Torres
This would be ideal for me since I often work from my bed with the kids. As I am doing so now, I wish I had this handy!
Kim Amy
I would say add some more corner supports if your kids are going to be on it too!
Shayla
This looks so handy! Just wondering, what do you do with it when it’s not in use?
Kim Amy
I just roll it to the foot of my bed!!
Kelly| Citytoast2southerntea
This is really cool and I love the way you gave pictures for each step.
Kim Amy
Thanks, let me know if try and build it yourself!!
Clarice
This is a great idea. You are amazing! I have also wanted this table and yes, it’s a bit expensive. Unfortunately, I do not have a talent for DIY projects so, I just have to save up for it in order to get one.
Kim Amy
If you change your mind, message me and I will walk you through it
Neha
Wow! This is awesome. I am terrible at this, but this whole creating a piece of furniture by yourself is inspiring.
Kim Amy
this was a pretty easy piece all straight cuts
Ala
This table is amazing, would love to make one for me as well. I am the fan of diy things.
Kim Amy
COOL make sure to show me it when you do
Rikki Ridgeway
This is so cool, I’m bookmarking this. I need my hubby to make me one. lol.
Kim Amy
snap a picture and let me know when you do!!
Jennifer Maune
This table is so cute! You did a great job! I bet the satisfaction of completing your own project is even better than saving money. Love it!
-Jennifer
Kim Amy
Totally….but I REALLY love saving money:)