This post contains affiliate links and I will be compensated if you make a purchase after clicking on my links.
I hope you had fun following along with my quickie decor project on Instagram. For videos look under my IKEA hack highlights bubble. If you weren’t there for it, here’s a recap. I decided to tackle a dark Hemnes glass door cabinet in my front room. Are you ready to see how you can complete a quick IKEA hack to brighten and personalize a sad piece of furniture? (the answer is a HELL YES!)
BEFORE:

AFTER:

looking for more pictures? here you go….
BEFORE:

AFTER:

Did you see the change in hardware? How about being able to see the treasures inside? Did you notice how much brighter this corner of the room looks? Let’s figure out this easy IKEA hack.
Here’s what you’ll need: (don’t worry it’s a short list)
- Liquid Sandpaper (deglosser)
- Primer
- Enamel interior paint
- Painting supplies (brushes/mini roller/paint tray)
- New hardware
- Coarse clean rag
- Tack cloth


Step 1: Prep

Empty your furniture and clean it up. Take out the shelves as able, the middle one was screwed in for stability so I kept it in. I took the others out and cleaned them up as well.
I needed to sand down the wood that I was going to paint because the coating doesn’t take paint well. To avoid the mess that manual sanding makes I used liquid sandpaper. This was my first time using it and it was super easy. All you need is a coarse clean rag. You wipe down the entire piece following the instructions on the bottle. After that’s done I cleaned up the surface with a tack cloth to remove any additional debris.
Step 2: Prime and Paint

I ended up completing 3 coats of paint. The piece was so dark and I was painting it with a much lighter color. Starting with priming the entire inside of the piece and the shelves and then adding on 2 more coats of my color. I chose Sandstone Cove by Behr. I was using the same color I had in my room for a more cohesive look. Cut it in with a bristle brush and then rolled it out with a 1/4 nap roller for a nice smooth finish.
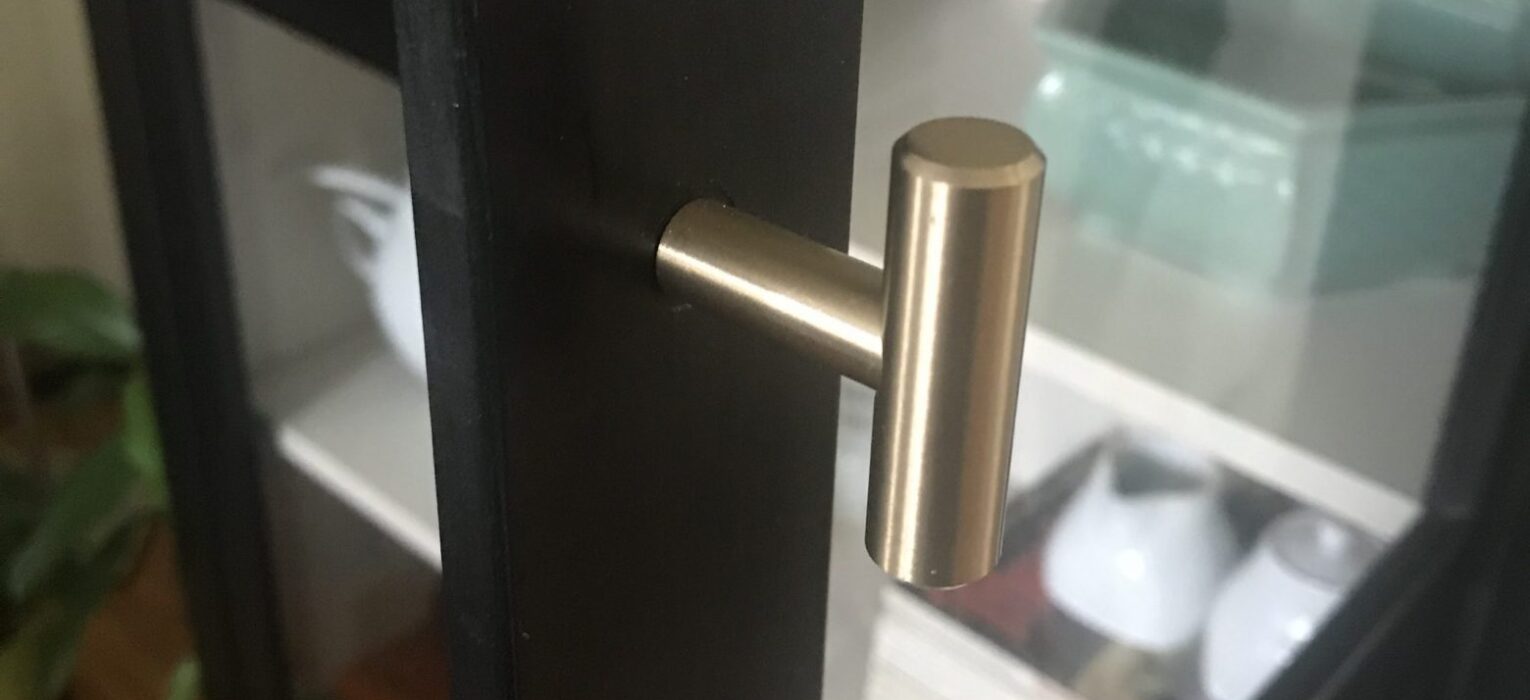
Step 3: Add Hardware

Here’s the hardware I used. I was able to use the same holes that the original hardware was in. So this was a quick step of remove the old and pop in the new. But what an updated look to otherwise drab hardware.
Step 4: Have Fun with Your Treasures
This was the hard part for me, I invited my neighbor over to help out with the arranging. Here’s her advise:
- Have varying heights (like peaks and valleys)
- Put collections together
- Try to stick with groupings of 3
- Ground small objects with larger ones
- Think in layers

Easiest IKEA hack ever! Right? Follow me for more tutorials @funhappinessandlife. Check my stories under IKEA hack for videos of all the steps! The list of supplies you will need to complete this is right HERE.
Kim
Wow! Changing the hardware and lightening up the shelves really changed this piece. Thank you for sharing.
Kim Amy
Thanks, it’s so nice to see the items in my cabinet now.
Kelly/Citytoastsoutherntea
This is so nice I am learning that just painting something will change it completely
Kim Amy
Yes, change it and the room that it’s in!
Vina
I love this! Like I want to restore some of my old furniture pieces and stuff, but have no clue most times where to begin lol. Thank you for sharing this.
Kim Amy
Vina, Go for it!! It’s so surprising what a little paint can do!!
Shannah
That is such a big difference! It looks really nice. Believe it or not I’ve never purchased any IKEA furniture. I’ve heard it is tough to figure out how to put it together.
Kim Amy
Actually it’s super easy to put together, but if you get a large piece you need to stay organized, it’s life sized legos:)
Ala
Wow, it looks amazing, never thought on restoring in such a cool way an old furniture. Thank you for sharing.
Kim Amy
so much easier and less expensive than finding and buying a new piece
Sarah
I love this cabinet it looks amazing.
Kim Amy
Thanks, now I like it….and it makes me want to do more
ciara
This is so cut! I can’t wait until we move so I can do some fixing up around the house
Kim Amy
One of the things I love about owning a house is being able to change it just a bit to suit my needs!!