This post contains affiliate links and I will be compensated if you make a purchase after clicking on my links.
I am so excited to share this sewing tutorial with you all. This tablet pillow stand was a little more ambitious than my last sewing endeavor, DIY pillow covers. I think if you follow the step-by-step instructions that you will be able to put this one together also. Working through the project from idea to actually sewing it was a little daunting at first. I worked out all the kinks (I hope) so now you can just follow the instructions and use this tablet stand at your leisure.
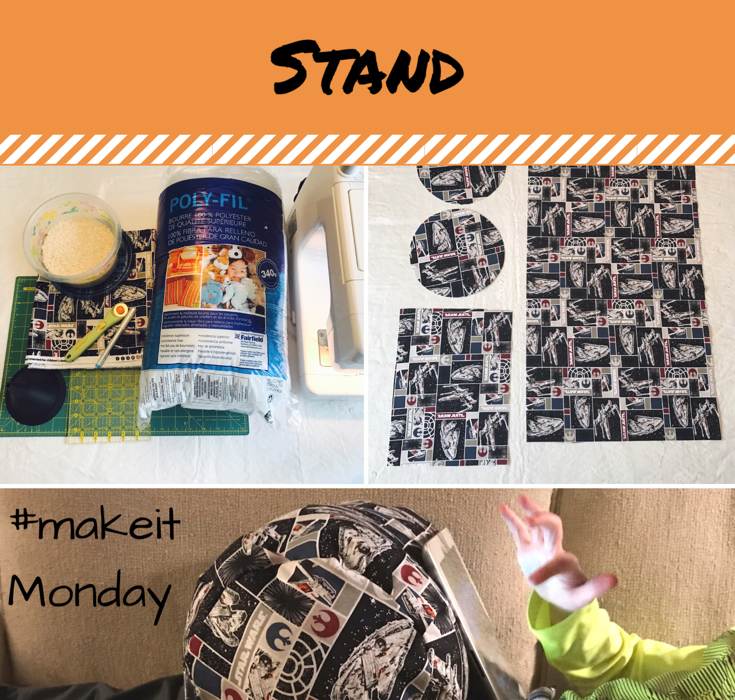
The first one I made is featured in this post, it was made for my husband’s birthday. He’s a Star Wars fan, so that’s the material I went with.
Step 1: Assemble your Materials
- sewing machine
- 1 yard of material
- coordinating thread
- pins
- fabric cutter
- seam ripper
- pinking shears (optional)
- pillow stuffing
- rice
- funnel
Step 2: cut out your fabric
You will need 2 circles of equal size for the ends of the pillow, 1 rectangle for the body of the pillow and 1 smaller rectangle for the tablet holder. To make your circles find a bowl that is the size you want your tablet pillow to be, trace that on the material and cut the two circles out.
To determine the size of your large rectangle you are going to have to rely a little on your algebra knowledge and the number pi (π). Don’t worry the equation is easily found with a quick google search of “equation for circumference of a circle from radius”. All you have to do is plug in your radius number. The radius is half the length of the diameter, or the length from the center of the circle to the edge.
My bowl was 8 inches in diameter, which makes my radius 4 inches. I put that into the equation of C=2πr and google spits out an answer of 25.13 inches. This is the length of my large rectangle. The width is 15 inches. Go ahead and cut out your large rectangle (25.13 x 15 inches).
The smaller rectangle is what your tablet will be place in or base, 8.5 inches by 10 inches. Yeah we are done with the part of sewing I like the least (I am not a fan of cutting and measuring).
Step 3: Sewing the tablet base
Fold the material in half lengthwise right sides in. Sew a straight stitch with ¼ inch allowance on each side from folded edge to open edge leaving about 1 inch open on one side next to the folded edge. Leave the side opposite the folded edge open and reverse it to right side out for the remainder of the project.
Next sew a straight stitch across the width of the material 1½ inches from the folded edge. This is the lane you will eventually fill with rice (don’t do it now, I made that mistake so you don’t have to). Sew another straight stitch ¾ inch away from the first line. In between those two straight lines, place a zigzag stitch to firm up this area. The zigzag stitch area is where your tablet will rest. Finally place another straight stitch across the material 1 inch away from the 2nd straight stitch line. When you are done the stitch lines from the folded edge will go: straight, zigzag, straight and straight. 
Step 4: Sewing the CYLINDER pillow
Create the body of the cylinder first and include the tablet base in the hem. Place your tablet base’s open seam in the middle of the right side of the 15 inch large rectangle. Fold the large rectangle in half so the right sides are on the inside along with the tablet base.

Pin this together and sew a straight stitch with a ½ inch seam allowance. Press the seam open.
To pin the circles correctly on each side of the cylinder. Fold the circles in half and mark on the fold line where half is.  Then mark the middle point of the ends of the cylinder.
Place the pins on these marks and work your way around the circle. Once the pins are in place sew the circles in place on the cylinder allowing approximately a ¼ seam allowance.
I was initially apprehensive about sewing a circle. Go slow, you can do it, and the pillow is forgiving so don’t worry. Once you are done sewing go around the circles with a pinking shears.
Step 5: Filling the Tablet Base
Using your seam ripper open up at least 2 inches of the cylinder and right side out the pillow.

Using your seam ripper on the tablet base open up the area between the two straight stitches closest to the pillow. There should be two open channels for rice to be poured into. I placed zigzag stitch on the opposite side of these openings to reinforce the edges of the base. Pour rice into these two open channels via a funnel. Once filled pin these openings tightly closed to avoid rice falling out while sewing them closed. Zigzag stitch along the open side of the base. 
Step 6: Stuffing the Pillow
You are almost there. Stuff that pillow to be as firm as you want it to be. Once stuffed use a basic slip stitch to close up the pillow. You are done. Go grab your tablet and see how it works!
Kim~madeinaday
Very cute & clever pillow! Pinned! Thanks for linking up at #MerryMonday!
Kim
Kim Amy
Thanks, it took a little bit to figure out, but I was happy with the result!
Sarah Howe @runjumpscrap
So impressed! I’m more of a crafter than sewer so am always fascinated by a sewer’s creations. Bet it is well loved. Thanks for sharing with #bestandworst x
Kim Amy
I am more of a crafter also, but enjoy seeing what I can do with a sewing machine.
Carolina Twin Mom / Mary Peterson
My son would go berserk over this! I love how you explain the process so methodically and the pictures help a ton too. Thanks for posting! #bestandworst
Kim Amy
Sure if you make it or have any questions please contact me!
Deborah
That’s such a great pillow! I could see my youngest using that for sure. Thanks for linking to the #homemattersparty
Kim Amy
Glad you like, my eldest (husband) was lucky to get this one!