This post contains affiliate links and I will be compensated if you make a purchase after clicking on my links.
I am so excited to share this Make It Monday creation with you all. This DIY succulent planter is one of those projects that I had an idea of what I wanted in my head, but was unsure if it would turn out as I desired. I have been looking at the succulents at the garden stores, on Pinterest and on Instagram. The simplicity of their look is beautiful and all the posts keep saying they are so easy to maintain….we shall see.
I had an idea for what I wanted for my patio table, but wasn’t sure I could find what I was looking for at the local Goodwill store. I was thinking a type of bundt pan, but the opening would be too small for what I intended. Then looking over the piles of discarded baking pans I came across the perfect jello mold.
Time to upcycle a jello mold into a succulent planter!
I took my $1 find home to make some easy improvements and viola it actually turned out how I envisioned. So if you have a history of Pinterest Fails (by the way love to follow that hashtag!) this is a great and simple project that turned out fabulous. The supplies I needed (and where I found them): jello mold (Goodwill), zip ties (basement), left over spray paint (basement), electric drill (basement), rocks (bucket in garage), and succulent plants (neighbor’s garden & Stein’s Garden Center).
Step One:
 Drill holes for drainage and zip ties in the base of your jello mold pan. Make sure the holes you make are large enough to fit the ties (I did not do that and had to re-drill later in the project timeline). If you need some guidelines for drilling through metal check out these nicely laid out suggestions, but for this project you will primarily need eye protection and a vice. The metal of the mold is very thin, although on a curve so a vice comes in handy to hold the project still when drilling. I did not have to make a starting dimple to set the drill bit, but you can if needed.
Step Two:
 Spray paint your the jello mold with Rustoleum (Textured Dark Brown). I used the same color that I use on my patio furniture. You could keep the pan the way it is or choose an alternative color for a pop of fun. I used what I had on hand. Make sure to paint in a well ventilated area, I sprayed outside on a non-windy day. I came back an hour later flipped it over and sprayed the other side. I let it dry thoroughly and was able to place my succulents in it the same day.
Step Three:
 Zip-tie the jello mold/succulent planter to your patio table. You obviously don’t have to do the this step, but I wanted mine to stay in place. I threaded the ties up through the bottom of the holes and pulled the zips through inside the planter. Trim off the excess length of the ties and move onto the last step.
Step Four:
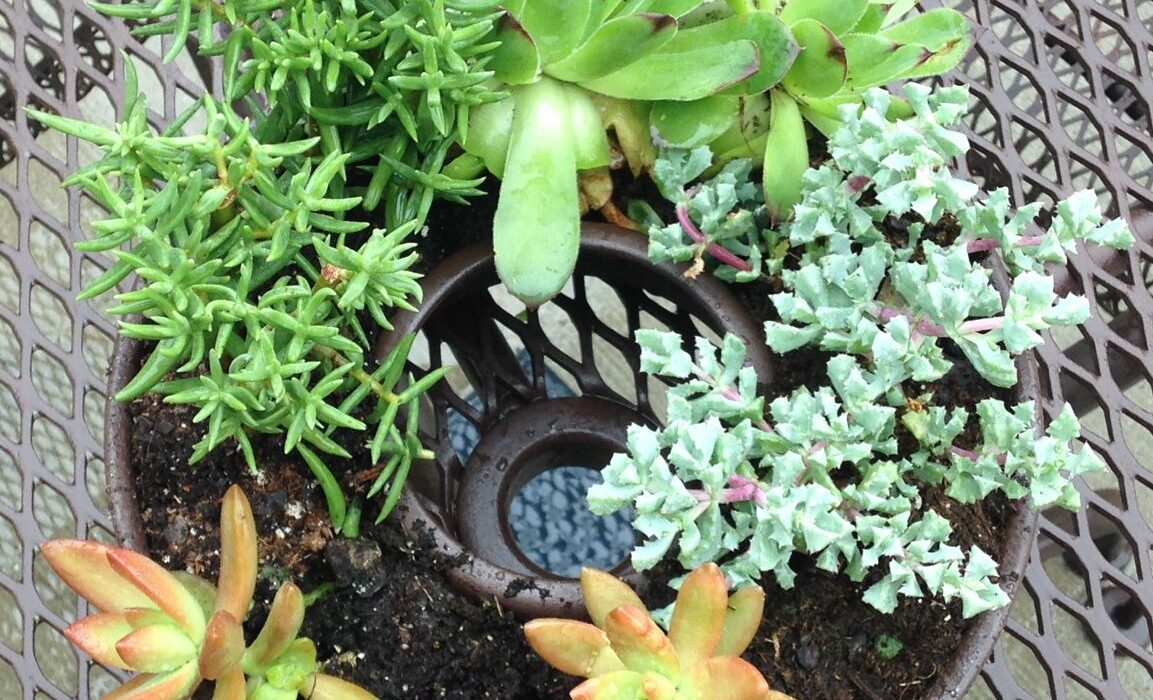
 Place rocks and plants into the succulent planter. I planted 4 different types of succulents. After I completed my project and took the pictures. I cleaned up the mess and like a fool I tossed my little plant markers with them. I think I remember that they all can handle full sun and a dryer planting. That’s why I chose them to go on my sunny patio and in a planter. I am great at watering in the beginning of the summer, but as it goes on I become a less observant gardener. For the names, I looked through the world wide web (is it still called that?) and think I found out the correct names. If you know that I have incorrectly labeled them please place a comment below so that I can correctly identify the succulents. Starting from the top and working clockwise: Echeveria Green Prince, Oscularia Deltoides, Echeveria Hookeri, and Lampranthus Roseus.
Step Five:
Step back and enjoy your new succulent planter with the umbrella in the table. I wanted to make a planter that could go on the table, but not take up too much space. The planter allows room for food and beverages. This is by far my favorite place to dine in the warmer months. I love being able to sit outside and listen to the neighborhood while enjoying a brandy slush and some brats on the grill. I am so happy that I will be able to enjoy my new planter this summer as well.


Carla
Okay I’m in love with this diy. So simple and easy to make. I might try doing this for my patio table. I’ve successfully killed a couple succulents. But then I discovered the power of a drill bit.
Grace & Peace,
Carla B.
http://www.carlabethany.com/easy-delicious-homestyle-ragu-recipe/
shez
Love your website! x
Kim Amy
Carla, I’m glad you like it. It was super easy to make and the plants are still alive a month later!
shez
Such a brilliant idea! Steal! lol
Kim Amy
Shez, totally steal it! It was one of the simplest DIY projects I have done.
Keith Haney
We are just starting to get our garden groove on. This looks like a simple DIY to tryout. Thanks
Kim Amy
This was super simple and they have not yet died!
Nicole | The Professional Mom Project
Such a great idea! I never would have thought to use a jello mold as a planter 🙂 Thank you for the inspiration
Kim Amy
Thanks, it was a chance that I took in good will it was the only container that seemed like it would work.
Ginger M Cochran
This is a super rad idea! I love succulents and up-cycled projects 🙂 A+!
Kim Amy
Thanks love making something that actually turned out how I wanted it!
Charlotte Burkholder
Thanks for joining us at Family Joy Blog linkup and sharing your creativity. Hope your little succulent garden does well.
Kim Amy
It did great last summer, hoping for the same this summer, just waiting for the threat of frost to pass before putting the plants outside!
Melissa
I love this very creative project! Thanks for sharing it with us this week at the Family Joy Blog Link Party!
Kim Amy
Thank you, it was so fun to make and actually turned out better than expected!
Christene Holder
What a cute and unique idea! I love that it fits perfectly into the umbrella place on an outdoor table. So creative! Thanks for sharing with us on the Family Joy Blog Link Party!
>> Christene
Kim Amy
Thanks, so happy you enjoyed it!
Kim Amy
Thanks Cristene, thinking I might add some more plants to it this year.
Beverly
Love your new planter and especially the fact that you fixed it to your patio table. Great idea.
Thanks for sharing at Over The Moon Party.
Hugs,
Bev
Kim Amy
Thanks, it really held up well all summer long! Just put it back on the table, for this year.
Kim Amy
Thanks Bev, I just re attached the planter for this summer, but waiting for the threat of frost to pass before I transfer the plants outdoors
Jann Olson
Very cute idea! I have done some on a bundt pan, but I love the jello ring around the umbrella! Thanks for sharing with SYC.
hugs,
Jann
Kim Amy
My first thought was bundt pan but alas the hole was too small!
Lori Hill-Smith
This is such a fun project! I love succulents!
Kim Amy
Thanks so much, aren’t succulents the best?
STEPHANIE ABBOTT
I love that! Thanks for sharing at To Grandma’s House We Go.
Kim Amy
Always, love your party.