This post contains affiliate links and I will be compensated if you make a purchase after clicking on my links.
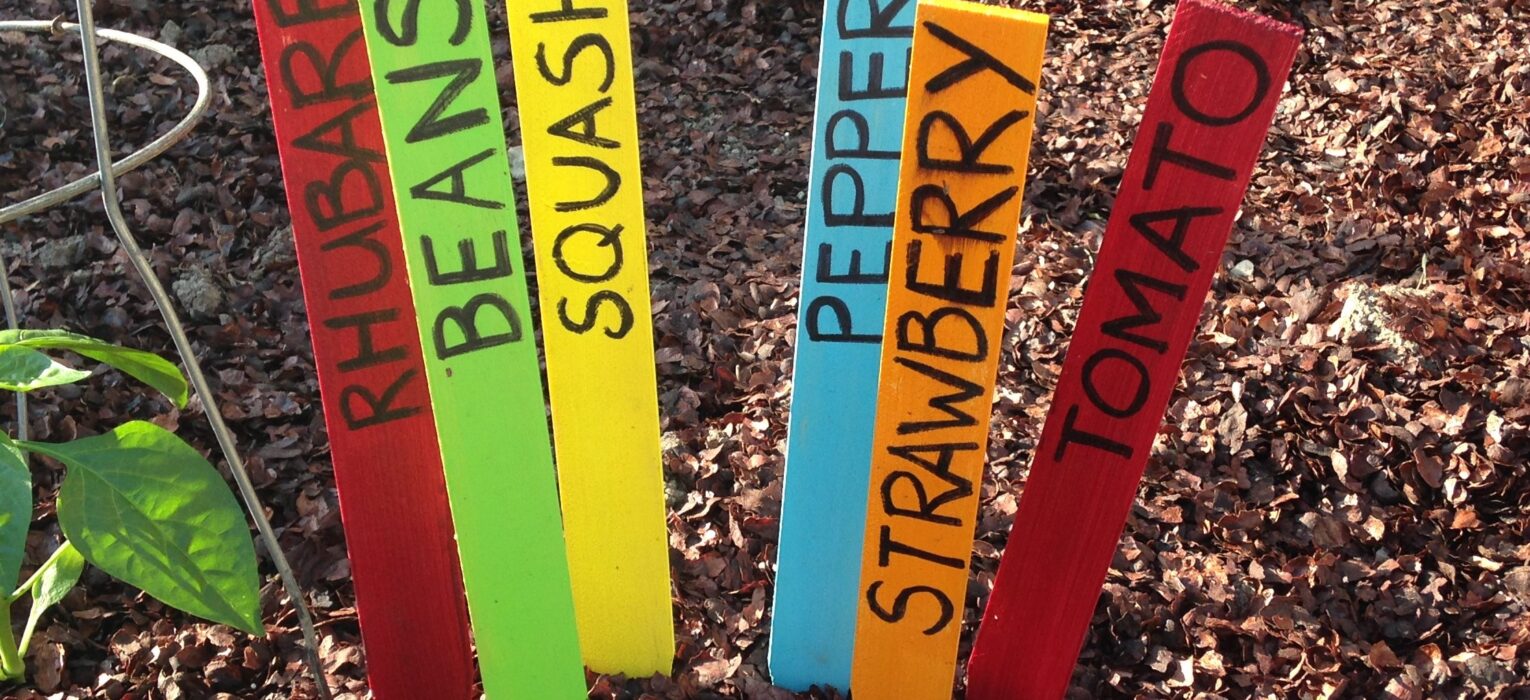
Spring is finally here! We hope the threat of frost is gone, so now it’s time time to get into our garden. I love our family’s little vegetable garden. It’s located right outside our kitchen door, so if I want to grab some lettuce or a tomato to put into a dish, I just run outside and get it. I have been looking in garden shops for fun garden stakes to label our vegetables, but wasn’t able to find anything that I really loved. I wanted something colorful and bold. Enter PINTEREST! You know I’m an addict, right?
 This garden project is fast, easy and turns out cute! I ran out the local Home Depot store and asked the lady at the paint counter for about 8 paint stir sticks, she was happy to oblige. I grabbed Mr. P’s old acrylic paints from his fine art days and selected some bright colors. Brush on the paint in about 2 coats so it is well covered. Complete one side, let it dry and then complete the other side. I left a little non-paint portion on the bottom, so I could hold on the sticks without getting paint all over my hands.
Upcycle those Paint sticks
Once the sticks were dry I listed out all of my garden veggies on a separate piece of paper, you’ll see why.
Grab a few Sharpie permanent markers (just in case one dried out in the middle of the project). I wanted to write the names on the sticks to have them go all the way to the end. I am not a good judgement of space and didn’t want the printing on the sticks to look crowded. Using my list, so I wouldn’t misspell the names, I began writing them backwards on the sticks.They turned out nicely spaced and I had enough non-written room to shove into the ground.
Once done and the sharpie ink totally dry, so it wouldn’t run when I sealed them, I took them outside. I put them in a mound of dirt so I could spray the garden stakes all the way around with Mod Podge acrylic sealer . As I began spraying the strawberry stake, I noted the ink started running right away. Change of plans, I laid them flat on the dirt to prevent running. Sprayed one side, allowed it to dry and sprayed the other side. No other running of ink and I didn’t feel that the strawberry stake was too badly damaged. You canuse a variety of sealers or just a clear outdoor paint like Rustoleum to make sure the DIY garden stakes last.

I hope you enjoyed this quick DIY project using just a few items to add a little color and whimsy to your garden. Check back in with us on Therapy Thursday this week where we’ll work therapy homework into starting up your garden!

Patti Bender
What a nice mix of topics on your blog–a real mom’s life! I’m a kinesiology professor – mom – biographer – gardener – decorator… I can relate.
funhappinessandlifeblog@gmail.com
Thanks Patti, I always question if it’s too many niches, but I guess it’s mainly my life. So I stick with it!
Linda at Mixed Kreations
Great idea! I really could use some plant markers and these would be inexpensive and so easy to make. I tend to plant then forget what I planted where.
Kim Amy
Me too Linda, they’ve held up in the rain and sun this summer so far. I hope they continue to last! Thanks for checking them out.